Monthly Archives: March 2017
Makerfire Micro FPV Racing Drone
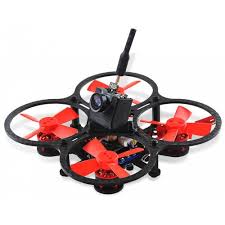
Makerfire Micro FPV Racing Drone is the latest entry into ducted fan micro racers joining the Tiny Whoop™ race. For the value and money, this quadcopter comes Ready To Fly or also available Crazepony the Bind-N-Fly version with DSM receiver. We received a BNF version from GearBest to test against a Devo 10 Deviation with DSM protocol and the results are good.
Analysis
Micro quadcopters have come a long way, with Jesse Perkins mounting a small FPV camera and video transmitter, showcasing some amazing indoor racing and calling it the Tiny Whoop™. Several manufacturers have since began to introduce their version of affordable ducted fan quadcopters and Makerfire Micro is noted to be a good entry in this category of indoor racing. The tall propeller guards allows the micro quadcopter to bounce off the wall without damaging the fans (propellers), surviving most crashes.
It is also beneficial to note that when paired with the popular opensource F3 flight controller, manufacturers are able to lower the cost of production. With a F3 flight controller, pilots can get several flight modes available instantly.
In Rate/Manual/Expert, this mode is the most challenging flight mode which uses the gyroscopes from the flight controller while the accelerometer is disabled . It allows the best control of the quadcopter, allowing pilots to do some amazing hairpin turns and aerobatics. This will however require some experience and not intended for beginners.
In Angle/Stability mode, the accelerometer is activated. This enables the quadcopter to self-level. If you don’t put in any input, the quadcopter will remain level. This is the mode that is used on the budget entry level quadcopters. It is however a great way for all pilots to practice control and orientation by flying in a number 8 pattern
In Horizon mode, this is a mix between Rate mode and Angle mode. It gives a pilot the best of both modes to perform flips and rolls and yet self-levels when the pilot centers the sticks but with Rate mode at it’s endpoint.
In the early days of racing drone, an inexperienced pilot would suffer a flip of death (FOD), but to the rescue, came “Air Mode”. In Air mode, pilots will be flying at all throttle levels, so if you chop the throttle, the stability corrections still come into play, even at minimum throttle, allowing the pilot to perform some amazing maneuvers at low throttle rates.
You will have to assign Air Mode as you would to a switch when setting up flight modes within Betaflight. The suggested best practices to test Air mode are:
- Arm motors (motors start spinning idling as an option)
- Enable AirMode with switch (check to ensure no idling windup on ground)
- Lift off and fly around (motors will never stop in flight even at lowest throttle and self levels)
- Just prior to landing, disable Air Mode by switch (as a safety)
- Land and disarm motors
The benefit of using ducted fans is they are fully protected and prevent the fans from causing any damage to walls, as well it is safe enough to be caught by hand!
One of the best kept secret of a Walkera transmitter is the ability to support multiple protocols with opensource Deviation. So if a pilot is flying a selection of models, such as Walkera, Blade, Eflite, Hubsan x4, Parkzone Micro Warbirds, Spektrum planes, you can turn an affordable Devo transmitter into a power house that supports these protocols. With a Walkera 12E 12 channel radio transmitter selling at $85 versus a Spektrum JRP12 at $1249, you can see the cost benefit of marketing a Walkera Devo 10 or 12E for micro racing drones.
Pilots can easily spend 5 minutes on each flight, setting up and flying. The actual flight may last 3-4minutes. On a Mode 2 radio transmitter, throttle stick is on the left.
Binding the Makerfire Micro to a new radio transmitter can be a challenge, you will likely need two pairs of hands to hold down the bind button, at the same time power on. However, you only have to do this once.
Once you have your radio bound to the Makerfire Micro, you will want to run some tests within Betaflight Goggle Chrome App. You will need a USB cable to connect your quadcopter to a computer. Make sure your throttle is within range, and the receiver is responding in the right direction for all stick movements.
To begin your first flight, power on your radio transmitter first, make sure your throttle stick is at the lowest point. Check to make sure all your switches are up (position 0). Connect your battery to your copter, lay the copter flat on a hard surface immediately.
Move your left throttle stick down to the lowest point and to the right, to unlock (arm) the motors. The copter is now live. To lock (disarm), move your left throttle stick down to the lowest point and to the left. You can change your setup to switches with Betaflight.
Flight Characteristics
The Makerfire is easy to fly on Horizon mode and can be switched to Angle mode or Rate mode. It accelerates at a high speed, so setting up dual rates is a good idea. Low rates at 70 scale on 30 exponential is a good start. It survived all of our indoor and outdoor crashes, which makes this quadcopter a hardy little thing.
Market Segment
Beginners, Indoors, Park Flyers, Ready To Fly, Off the shelves, Budget [$] (PRICE CHECK: $64PNP ■ Mar 2017 Sara’s Pick)
Competitors / Similar Models
Users have considered these 2017 alternatives: Furibee F36s, KingKong Tiny6, Eachine E010s, Blade Inductrix
Camera
The camera is a acceptable 520 TVL camera, capable for night flying. See video for results.
Factory Specifications
Flight controller: F3 EVO with STM32 F303 MCU
Receiver: DSM 2.4GHz 8CH
Video transmission: 5.8G 40CH 25mW
Video resolution: 520TVL
Receive distance: 300m
Motor: 615 coreless motors with 65000 RPM
Battery: 3.7V 200mAh 35C
Flight time: about 5 minutes
Charge time: 30 minutes
Charging method: USB
Market Demand Trending
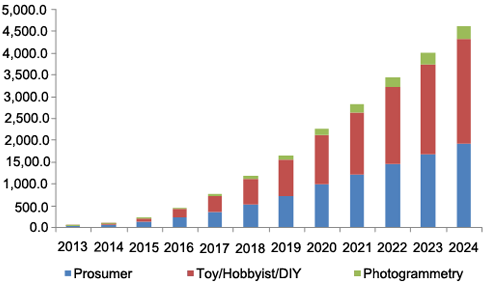
Buy/Sell. Manufacturers and dealers, these tiny inspired whoops are hitting the market as fast as the first phantom and 350 pros were a few years ago, as hobbyist takes a turn towards micro quadcopters; showing a steady growth in the market. A snapshot from Grand View Research 2016.
Eachine Micro Skyhunter FPV RC Airplane
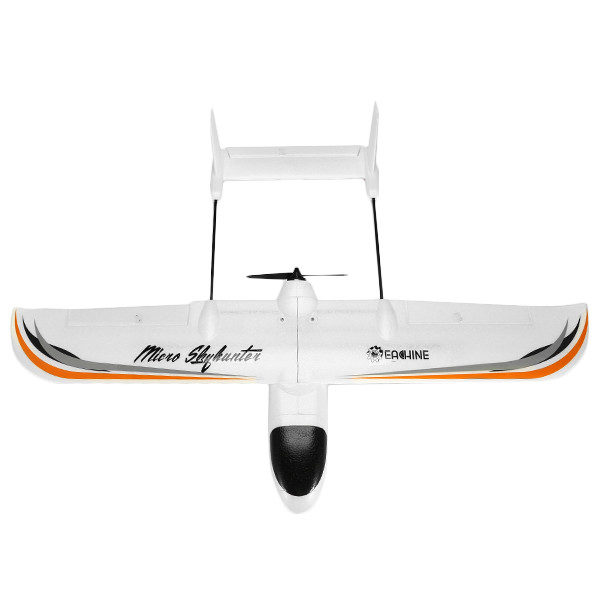
Skyhunter, has been an all-time favorite plane for lots of long-range FPV pilots. Eachine doing it’s match, takes on the micro version, at 780 mm, 3 channels, plug and play. Take a break from the racing drones, here comes a racing plane. If you are looking for a budget, simple hand launch RC FPV plane with some speed, you may be in luck.
User Segment
Keen Beginners, Park Flyers, Plug and Fly, Budget $59 BNF (source: Dec 2016 Banggood)
What To Expect
The Micro Skyhunter FPV is one of the coolest miniature version of the Skyhunters released under the label of Eachine. I have here the FPV version with 40 channels and 800 tvl camera which you can just slip on or remove anytime.
Here is a video of everything you need to get setup.
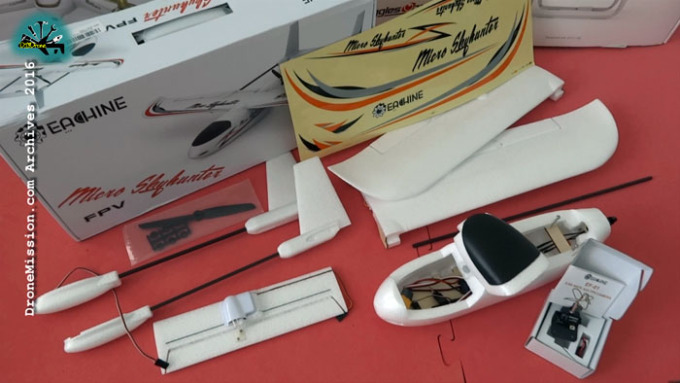
The Skyhunter comes in this small box just under 1 1/2 feet, very well pack, box in a box and individually wrap. All electronics are pre-assembled, plug and play, so you can begin flying on the same day. It comes with a few cabon fiber spars, the main spar and re-enfocement along the wings. You can see the signature look of a skyhunter with two veritical stablize. I like how everything is pre-installed, 5 grams servo, servo linkages are all ready using JR connectors. Included is a Hobbywing 20 amps electronic speed controller(ESC) with a XT 60 plug.
There is plenty of room, you have three separate compartments, one section for your receiver and flight controller if you are using one, and a two in one canopy held on by magnets for the battery and a convenient camera fpv bay. The wings are held together with two bolts.
The camera is pretty good, other than the 25 mw range limitation, we have no complaints. You can of course always use a different video transmitter. There are some crack lines, along the joints, but nothing too serious, I just add a little tape along it and tape along the leading edges, wing tips and base for additional protection and to prevent wear and tear.
Motor is powerful for this size plane, 2300 kv 2204.
The camera comes with a holder plate, very nice, and you simply secure it on the camera bay when in use. I just tape the plates down for easy removal.
Decals are included, but I like my usual red/blue white colors.
Overall, this plane has everything you need, easy to assemble as all the electronic are installed. It uses XT 60 which means LiPo batteries are easily available in the market. The bigger question is, are you up for a 3 channel plane, if you are, this is definitely a keeper within budget.
Flight Characteristics
Tracks very well, but not a great glider. We are currently completing a few more flights before reporting back. Standby.
Camera & Video Transmitter
The camera is okay, a 40CH 25MW VTX 800TVL 1/3 CMOS FPV Camera. See video for results.
Factory Specifications
Brand Name: Eachine
Item Name: Micro Skyhunter
Wingspan: 780mm (31″)
Length: 540mm (21″)
Channels: 3
Weight: 230g (without battery)
Color: White
Material: EPO
Camera: Eachine EF-01 AIO FPV camera
ESC: 20A 2-3s with XT60 connector
Motor: Eachine 2204 2300KV
Motor MAX Thrust:440g
Motor Weight: 25g
Motor Shaft Diameter: 3mm
Propeller: 6×3 or most 5-6″ multirotor props
Servos: 3x 9 gram
What we love about it
- Well design and quick assembly
What is essential we hope to see in the next version
- Nothing really to change, but love to see more miniature version of classic planes under the Eachine label


