Monthly Archives: November 2016
Frsky Horus X12S
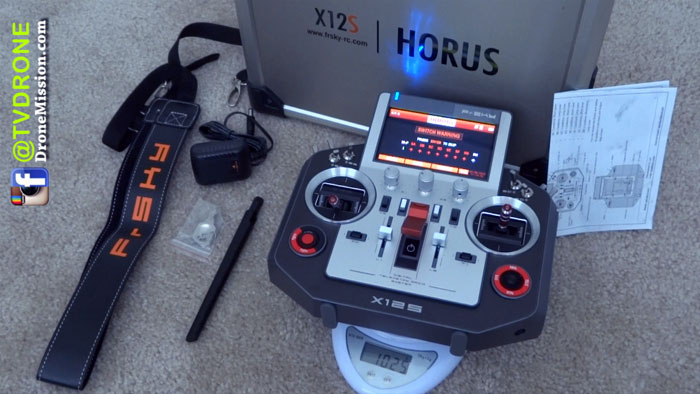
Frsky Horus X12S radio transmitter, 16-32 channel system, is built to make you the God of the Sky, just like the Egyptian God Horus. Just tilt the transmitter to facilitate auxiliary control as there is a built-in 6-axis sensor. Includes Voice Alerts for things like; audible count down timers, low voltage warnings, landing gear down warnings etc., just about anything can be programmed and with full telemetry capability and GPS. ■ by dronemission.com
User Segment
Keen Hobbyist, Pro Radio Transmitter, Collectors, Budget [$$] (PRICE CHECK ■ Nov 2016 Arthur’s Pick at Banggood)
First Impression, the material used is heavy-weight milled CNC aluminum, like a military-grade version of the popular Frsky Taranis. It is impact resistance, weight just under 3 pounds. The sticks equipped with six ball bearings for precision and durability. A lot of programming features to keep you up learning and discovering.
What To Expect
It may be overwhelming at the first, but take your time to explore features of a Horus. One of the best features of the Horus is its full telemetry capability, as well as RSSI signal strength feedback, there are 3 different programmable failsafe modes and receiver lock, so no more crashes due to selecting the wrong model. If you have stock in other brand receivers or B&F’s, no worries the Horus has a JR style RF module slot, so you have the option of other brand modules such as the Orange DSM2/DSMX or Open LRS 433mhz module. An inbuilt GPS module helps your model know where you are at all times, making it easier to return to you.
Similar Models
Users have considered these 2016 alternatives: Frsky Taranis
Factory Specifications
Brand: Frsky
Item Name: Horus
Number of Channels: 16CH / up to 32CH
Operating Voltage Range: 7~15V (2s,3s lipos acceptable)
Backlight LCD Screen: 480*272, high resolution TFT color screen
Model Memories: 60 (expandable with SD card)
Advance Functions: Full telemetry capability inbuilt GPS module
Gyro: 6-axis sensor (3-axis gyro and 3-axis accelerator)
Trainer: Inbuilt wireless trainer system
Compatibility: FrSky X series, D series, L series and V8-II series receivers
What we love about it
- Audible count down timers
- Audible programming
- Low voltage warnings
What is essential we hope to see in the next version
- FPV video screen and DVR

In terms of ranking, I would say it is in the top 7 favorites during this release recorded November 2016. An update to follow
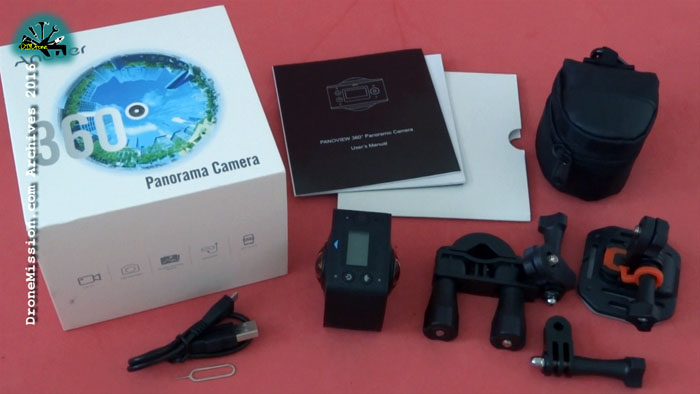
360 FPV videos
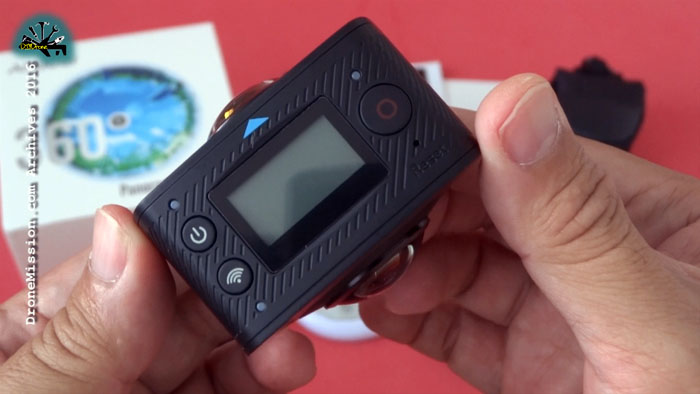
What the Andoer Dual-lens 360°, Ricoh Theta S and Samsung Gear 360 have in common are the dual-lenses that allows you to film and upload 360-degree videos. This give rise to a new perspective if drone aerial first person view
YouTube and Facebook now supports uploading and playback of 360° spherical videos. To watch 360° videos, you need the latest version of Chrome, Opera, Firefox, or Internet Explorer on your computer. On mobile devices, use the latest version of the YouTube app for Android or iOS.
(Best viewed in 360 youtube app or goggle directly by opening this link https://youtube.com/360)
For an immersive experience, you can even watch 360° videos with a cardboard goggle attaching the YouTube Android app.
After a week of filming, we begin to discover that is just a few things to consider before creating the video.
- Decide the best way to mount the camera without appearing to be holding a tripod (you likely don’t want to be showing your crown, if you realized you are being filmed no matter where you stood in 360).
- What if you want to incorporate text on the video or include a logo, not knowing if your audience is looking front, back, sides, down or up.
- Storyboarding and sequencing scenes in 360. How do you mix 2D and 360 footages?
The following 360 cameras are compatible with YouTube and are available today:
• Andoer Dual-lens 360° (budget $125 source: Nov 2016 camfere.com)
• Ricoh Theta S
• Samsung Gear 360
For the best results, encode your video at a high resolution and according to YouTube’s advanced specifications. YouTube currently supports 360° videos with 24, 25, 30, 48, 50, or 60 frames per second. We recommend uploading 16:9 aspect ratio stitched videos in 4K (3840×2160) resolution as a loss of resolution is inevitable when playback in youtube 360. A 1080p video, when stretçhed and wrapped around the sphere will look like 480p.
When uploading your 360° video, don’t make edits to the video using the YouTube Video Editor and Enhancements tools on desktop or mobile. These tools don’t currently support 360° videos.
Before publishing, schedule the video for a later date and verify that the file has 360° playback enabled by watching the video on your device. It may take up to 30 minutes for 360° playback to be processed after uploading.
360° videos on a browser feature a pan button in the top left, and can be rotated using the WASD keys, so look for these features to confirm your video is in 360.
If you take the video straight out of the camera and try to upload it to Youtube, it’s not going to work properly. The video will upload and be available, but when you go to view it you’ll see a stereoscopic image–an odd-looking video of side-by-side circles, each showing the hemisphere captured by one of the two lenses.

To make it work properly there are two steps you have to do before uploading it.
1. You will need to convert the image from stereoscopic view to an equirectangular one. That will combine the two hemispheres into a wide view with dimensions where the width is exactly double the height (otherwise known as a 2:1 aspect ratio). And the tops and bottoms of the frames will look strange and stretched. But when used in a specialized 360° player those stretched parts of the frame will fill out when you look up or down, wrapping around the sphere 360.
If you own the budget Andoer 360 camera, you can use the recommended unregistered Symax 360 software – Open Convertor, set Video Quality = High, Start.
2. In order to upload and playback a 360° video file, you’ll need to modify the metadata of the video file with an app or script before uploading.
Follow these instructions to install an app that will add the necessary metadata into a new file for you.
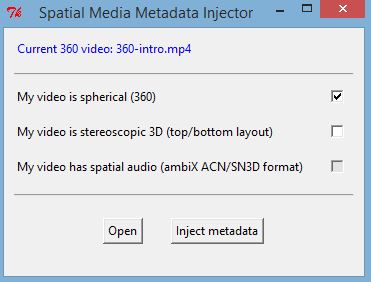
- Download the 360 Video Metadata app for Mac or Windows recommended by YouTube
- Un-zip the file, then open the 360 Metadata Injector app. If you’re on a Mac, you may need to right-click the app and then click Open.
- You can also add the metadata using a Python script.
- Select the original or edited 360 video file
- Select the checkbox for My Video is Spherical (360) and click Inject Metadata. Do not select the “3D Top-bottom” checkbox. For more information, refer to upload instructions for virtual reality videos.
- Save the file that will be created suffix with “injected.mp4”.
- Save the file. A new file will be created automatically in the same location as the original file.
- Upload the new injected file to YouTube.
- Wait for the 360° conversion to process. This may take up to 30 minutes for a 7 minutes video.
Tip: Andoer Dual-lens 360° 960p on Premiere Pro, follow 1920x 960 size, h.264